On this tab, you can select options for the report format.
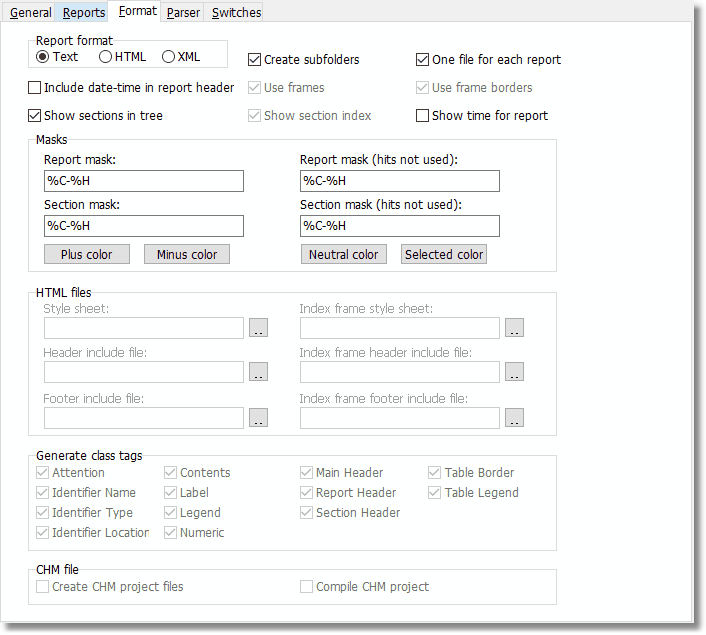
Report format
Default = HTML
Select between reports in text, HTML or XML. The HTML format (default) is suitable for web publishing (Internet). There are also more ways to customize the layout and appearance of the reports. With HTML, the Complexity Report also adds a few illustrative charts to the contents.
On the other hand, an advantage with text files is that they are somewhat faster to load. XML is the preferred format for transferring PAL data to for instance a database. However, the XML format is rather spacious and those files can become very large and the time to load them for viewing is often long.
You can view the HTML and XML reports in PAL's main window, or in your browser
(e.g. MS Internet Explorer, Netscape). PAL uses Microsoft's Shell and Doc Extensions API. Thus, when you view the HTML reports in PAL, you are actually viewing them in the same way as if you view them in MS Internet Explorer. Even the context sensitive menus are available (via mouse right-click).
To load the HTML reports in your browser, select MyProj_Index.htm if frames are used, where MyProj is the name of the parsed main file. If frames are not used, load Contents.htm when several report files are created, or MyProj.htm if all reports belong to a single file.
Create subfolders
Default = Yes
If you select this option, PAL will create a separate subfolder beneath the report folder for each project that is analyzed. E.g. if a Delphi project Gcache.dpr is analyzed and the report folder is set to D:\Data\PALReports a folder D:\Data\PALReports\GCache is created. The generated report files are stored in that folder.
One file for each report
Default = Yes
Select this option if you want a single report file (text or HTML) for each report.
The reports are named Status.htm, Warnings.htm etc.
Include date-time in report header
Default = Yes
Mark this checkbox if you want a text string with the current date and time included at the top of each report.
Use frames
Default = Yes
Check this option to generate HTML frame pages. This option is only available when HTML reports are selected. The option "One file for each report" (see above) must also be selected. If frames are used, a left frame page will keep an index to the different reports.
Use frame borders
Default = Yes
Check this option to generate frame borders. This option is only available when HTML reports and frames are selected.
Show sections in tree
Default = Yes
Check this option to include report sections in the report tree in the main window. This will allow you to jump directly to a report section by clicking on the appropriate line in the report tree.
Show section index
Default = Yes
For reports that are divided in several sections, like the Warnings Report, you may select this option to let PAL generate an index at the top of each report. This option is only available when HTML reports are selected.
Show time for report
Default = No
Check this option to include information about the time needed to generate a report. This information is written at the bottom of each report. Time usage for each section in the report is also written.
Report mask
Specify the format mask to use when displaying a report caption. The mask will only be used when section counters are displayed, otherwise only the plain caption is displayed.
For example, the mask:
%C-%H (%1, was %2)
will for the Optimization Report display:
“OPTI-Optimization Report (3, was 5)”
Those placeholders can be used:
%C report code, like "WARN1" etc, see report topics
%H report caption
%1 counter (reported items)
%2 old counter
The default mask is:
%H (%1, was %2)
Report mask (no hits)
Specify the format mask to use when displaying a report caption. The mask will only be used when section counters are not displayed.
For example, the mask:
%C-%H
will for the Call Tree Report display:
“CTRE-Call Tree”
Those placeholders can be used:
%C report code
%H report caption
The default mask is:
%C-%H
Report section mask
Specify the format mask to use when displaying a report section caption. The mask will be used when section counters are displayed.
For example, the mask:
%C-%H (%1, was %2)
will for one section in the Optimization Report, display:
“OPTI4-Virtual methods (procedures/functions) that are not overridden (3, was 5)”
Those placeholders can be used:
%C report code, like "WARN1" etc, see report topics
%H report caption
%1 counter (reported items)
%2 old counter
The default mask is:
%H (%1, was %2)
Report section mask (no hits)
Specify the format mask to use when displaying a report section caption. The mask will be used when section counters are not displayed.
For example, the mask:
%C-%H
will for one section in the Object-oriented Metrics Report, display:
“OOME1-Weighted methods per class (WMC)”
Those placeholders can be used:
%C report code
%H report caption
The default mask is:
%H
Plus color
Press this button to select the color used for “plus” captions, e.g. when the number of “new” warnings is greater than the number of “old” warnings, like in this caption:
“(5) Identifiers never used (was 3)”
Minus color
Press this button to select the color used for “minus” captions, e.g. when the number of “new” warnings is greater than the number of “old” warnings, like in this caption:
“(3) Identifiers never used (was 5)”
Neutral color
Press this button to select the color used for “plus” captions, e.g. when the number of “new” warnings is the same as number of “old” warnings, like in this caption:
“(5) Identifiers never used (was 5)”
Selected color
Press this button to select the color used for the background of the selected item in the report tree. You should make sure that this color fits together with the colors selected for plus, minus and neutral (see above),
Style sheet
Default = (blank)
Pascal Analyzer includes a style sheet block with default settings in every HTML report.
If you want to use your own customized style sheet, enter the absolute or relative link to it in
this input field. E.g. if the HTML reports are created in the D:\Data\PALReports\GCache
folder, and the style sheet file is in D:\Data\PALReports\PALstyles.css, you should
enter "../PALstyles.css".
If this field is blank, PAL will include the style sheet block, otherwise it will just
include a HTML link (<LINK REL) to the external style sheet file.
This is the style sheet block that is inserted at the top of each HTML file. You may use it as a template when creating your own style sheet.
<STYLE TYPE="text/css">
<!--
BODY{BACKGROUND: #FFFFC4; FONT-FAMILY: Verdana,Arial; FONT-SIZE: 10pt}
H1{COLOR: #000000; FONT-FAMILY: Verdana,Arial; FONT-SIZE: 14pt}
TD{COLOR: #000000; FONT-FAMILY: Verdana,Arial; FONT-SIZE: 10pt}
.Attention{COLOR: #FF0000; FONT-FAMILY: Verdana,Arial; FONT-SIZE: 10pt}
.IdN{COLOR: #000000; FONT-FAMILY: Verdana,Arial; FONT-SIZE: 10pt; FONT-WEIGHT: BOLD}
.IdT{COLOR: #000000; FONT-FAMILY: Verdana,Arial; FONT-SIZE: 10pt; FONT-STYLE: ITALIC}
.IdL{COLOR: #000000; FONT-FAMILY: Verdana,Arial; FONT-SIZE: 10pt}
.Contents{COLOR: #0000FF; FONT-FAMILY: Verdana,Arial; FONT-SIZE: 10pt; FONT-WEIGHT: BOLD}
.Label{COLOR: #0000FF; FONT-FAMILY: Verdana,Arial; FONT-SIZE: 10pt; FONT-WEIGHT: BOLD}
.Legend{COLOR: #0000FF; FONT-FAMILY: Verdana,Arial; FONT-SIZE: 10pt}
.Numeric{COLOR: #000000; FONT-FAMILY: Verdana,Arial; FONT-SIZE: 8pt}
.MainHeader{COLOR: #000000; FONT-FAMILY: Verdana,Arial; FONT-SIZE: 10pt; FONT-WEIGHT: BOLD}
.ReportHeader{COLOR: #000000; FONT-FAMILY: Verdana,Arial; FONT-SIZE: 14pt; FONT-WEIGHT: BOLD}
.SectionHeader{COLOR: #000000; FONT-FAMILY: Verdana,Arial; FONT-SIZE: 12pt; FONT-WEIGHT: BOLD}
.TableBorder{BORDER-BOTTOM: #000000 1px solid; BORDER-LEFT: #000000 1px solid; BORDER-RIGHT: #000000 1px solid; BORDER-TOP: #000000 1px solid}
.TableLegend{COLOR: #008080; FONT-FAMILY: Verdana,Arial; FONT-SIZE: 10pt; FONT-WEIGHT: BOLD}
-->
</STYLE>
The style sheet includes styles for the following classes:
Attention Text that points out anomalies, e.g. unused unit in Uses Report
IdN Identifier names, e.g. DrawCanvas
IdT Identifier type, e.g. Integer
IdL Identifier location, e.g. CodUtil(321)
Contents Text in contents list
Label Descriptive text like “Analyzed by” in the Status Report
Legend Descriptive text for an entire table, like “Abbreviations in Complexity Report
Numeric Numeric, e.g. “350”, like in Totals Report
ReportHeader Report header
SectionHeader Section header
MainHeader Header in sections
TableBorder Table borders
TableLegend Legends in tables
Header include file
Default = (blank)
If you enter an URL in this field, PAL will include the file at the top of each HTML report.
Use this to include common header information on each page, like company name, logo etc.
Footer include file
Default = (blank)
If you enter an URL in this field, PAL will include the file at the bottom of each HTML report. Use this for common footer information.
Index frame style sheet
Default = (blank)
Pascal Analyzer includes a style sheet block with default settings in the index frame HTML page. If you want to use your own style sheet, enter the absolute or relative link to it in this input field. E.g. if the HTML reports are created in the D:\Data\PALReports\GCache folder, and the style sheet file is in D:\Data\PALReports\PALstyles.css, you should enter "../PALstyles.css".
If this field is blank, PAL will include the style sheet block, otherwise it will just include a HTML link (<LINK REL) to the external style sheet file.
Index frame header include file
Default = (blank)
If you enter an URL in this field, PAL will include the file at the top of the index frame page for HTML reports. This option is only available when HTML frames are selected. Use this to include common header information on the index frame page, like company name, logo etc.
Index frame footer include file
Default = (blank)
If you enter an URL in this field, PAL will include the file at the bottom of the index frame page for HTML reports. This option is only available when HTML frames are selected. Use this for common footer information.
Generate class tags
For every checkbox that you select, PAL will generate extra HTML code to select the corresponding font class, as defined in the style sheet (see above). This will increase the size of the HTML files considerably, so just select those font classes that you want to customize. All options are by default selected.
For instance, to activate a special font for all identifier names, check "Identifier Name". Then edit the font class definition ("IdN") in your style sheet file. Make sure the style sheet is referenced in the "Style sheet URL" field.
Create CHM project files
Mark this checkbox if you want Pascal Analyzer to create CHM project files, in addition to the generated HTML pages. This is especially handy if you have generated HTML files and want full-text search. This option is only enabled if you have selected HTML as the report format on the top of the tab page.
The CHM project files including the resulting CHM file will be written to the output directory. You can either work with the project files in HTML Help Workshop, or compile them directly from within Pascal Analyzer.
Default = No
Compile CHM project
Mark this checkbox if you want Pascal Analyzer to compile the CHM project, and produce a compressed CHM file. You must first download and install "HTML Help Workshop version 1.3" from Microsoft.
This option is only enabled if you have selected HTML as the report format on the top of the tab page, and if you have marked the "Create CHM project files" option (see abouve).
When compiling, a log file will also be created in the output directory. It will have the name format <ProjectName>.log. Check this file if errors occur.
Please note that the compilation for a help file can take a while. You can always create a CHM project file, and then later decide to compile it manually with the help compiler.
Default = No
See also: